このブログでは、Julia言語のMakieパッケージを用いたメッシュの描画方法に
ついてまとめています。
1.Julia言語とMakieパッケージ
・Julia言語 https://julialang.org/
ドキュメント
https://docs.julialang.org/en/v1/
https://hshindo.github.io/julia-doc-ja-v0.6/manual/introduction.html
・Makieパッケージ
https://makie.juliaplots.org/stable/index.html
https://github.com/JuliaPlots/Makie.jl
・MakieGallery
https://github.com/JuliaPlots/MakieGallery.jl
(MakieGalleryはしばしばupdateされます。)
2.メッシュの描画
メッシュの描画には、AbstractPlottingオブジェクトのmesh メソッドを
使用します。
meshメソッドの書き方は以下のようになります。
① mesh(x, y, z)、mesh(xyz)
② mesh(x, y, z, faces)、mesh(xyz, faces)
③ mesh(mesh_object)
以下、MakieGalleryのExamplesを参照して、メッシュメソッドの使い方を見て
いきます。
(1)Colored Triangle
① の書き方の例
実行結果

プログラム
colored_triangle.jl
using Makie

scene = Scene(resolution = (600, 600))

scene = mesh!(scene,
      [(0.0, 0.0), (0.5, 1.0), (1.0, 0.0)],  color = [:red, :green, :blue],
      shading = false
)・プログラムの編集・実行には、VSCodeを使用しています。
・Windowサイズの調節のため、Sceneの文を入れています。
・sceneの書き換えを行うので、mesh!メソッドを使っています。また、colorと
shadingのアトリビュートを追加しています。
頂点座標は次のようになっています。
V1:(0.0, 0.0)、V2:(0.5, 1.0)、V3: (1.0, 0.0)
頂点座標の設定は、次のように書くこともできます。
x = [0.0, 0.5, 1.0]
y = [0.0, 1.0, 0.0]
z = [0.0, 0.0, 0.0]

scene = mesh!(scene,
      x, y, z, color = [:red, :green, :blue], shading = false
)
* zを追加して3次元表示をしないと、MethodErrorを起こします。
(2)Colored Mesh(Tetrahedron)
② の書き方の例
実行結果

(座標軸を回転させています。)
プログラム
tetrahedron.jl
using Makie

scene = Scene(resolution = (600, 600))

x = [0, 1, 2, 0]
y = [0, 0, 1, 2]
z = [0, 2, 0, 1]
color = [:red, :green, :blue, :yellow]

# indices interpreted as triangles (every 3 sequential indices)
indices = [1, 2, 3,   1, 3, 4,   1, 4, 2,   2, 3, 4]

scene = mesh!(scene, x, y, z, indices, color = color)
頂点座標(x、y、z)は次のようになっています。
V1:(0, 0, 0)、V2:(1, 0, 2)、V3: (2, 1, 0)、V4: (0, 2, 1)
三角形を描画するための頂点番号は、indicesで設定します。
頂点座標の設定は、次のように書くこともできます。
xyz = [(0, 0, 0), (1, 0, 2), (2, 1, 0), (0, 2, 1)]
scene = mesh!(scene, xyz, indices, color = color)
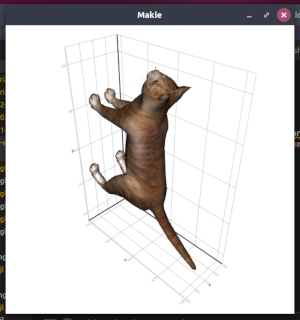
(2)Textured Mesh
③ の書き方の例
実行結果

プログラム
textured_mesh.jl
using Makie
using FileIO, GLMakie

scene = Scene(resolution = (500, 500))

catmesh = FileIO.load(GLMakie.assetpath("cat.obj"), GLNormalUVMesh)
mesh!(scene, catmesh, color = GLMakie.loadasset("diffusemap.tga"))
catmeshがmesh_objectです。mesh_objectは、 HomogenousMesh型です。
println()でcatmeshを出力すると、以下のように表示されます。
HomogenousMesh(
      faces: 3954xGeometryTypes.Face{3,GeometryTypes.OffsetInteger{-1,UInt32}},
      texturecoordinates: 2248xGeometryTypes.TextureCoordinate{2,Float32},
     vertices: 2248xPoint{3,Float32},
     normals: 2248xGeometryTypes.Normal{3,Float32}, )
これは GLNormalUVMesh型のmesh_objectです。
・HomogenousMeshは、GeometryTypesパッケージで定義されています。
(/src/types.jl)このmesh_objectを使用するときは、通常GeometryTypesの
使用宣言をします。
・GLNormalUVMeshは、Makieの使用宣言だけで利用できます。
(GLNormalUVMeshは、AbstractPlotting.jlの中でexport宣言されています。)
・HomogenousMeshから派生した様々なMesh型が、/src/typealias.jlで定義
されています。
SimpleMesh、NormalMesh、GLNormalMesh、GLNormalUVMeshなどが
あります。